Android Data Recovery
How to Root Android in Recovery Mode
-- Thursday, June 29, 2017
People also read:
Now, we provide detailed and complete introductions to you about Recovery mode and how to root Android in the recovery mode.
- Part 1: What Is Recovery Mode?
-
Part 2: Differences Between Android System Recovery & Custom Recovery
-
Part 3: How to Root Android in Recovery Mode
-
Part 4: Solve Bricked Phone If It Fails to Root(Only for Samsung Phone)
Part 1: What Is Recovery Mode?
What is Recovery Mode? You may have known something about it somewhere else before. Here, we say it one of the Android system modes that you can enter to update or back up the system files with zipped ROM on the SD card. There are two kinds of recoveries on Android: Android's Stock Recovery and the Custom Recovery. Previous Recovery version offers you just three options, which don't allow you to back up the system, and you can only update the device through "update.zip" file. With new Recovery version, more options are provided for you to choose.
So, now let's check the general options in the Recovery mode.
1. Update from .zip file on SD card.( Several choices of capacity are offered in "Partition SD Card". Select the one you want and press "Power" key to create partitions for your SD card. Better to back up your files before you do this)
2. Backup and Restore in Recovery Mode
3. Factory Reset Android.
4. Advanced and Debugging Menu
...
Part 2: Differences Between Android System Recovery & Custom Recovery
The default Recovery in Android - Android System Recovery, which carries with the Google's recovery environment, is also called Android's Stock Recovery. It helps users in recovering device(such as performing factory reset), flashing OTA update files and ROMs provided by the device's manufacturer.A Custom Recovery, which is different from the Android System Recovery, is a third-party recovery developed by third-party developers. For example, ClockworkMod (CWM) and Team Win Recovery Project (TWRP) are the two most popular recoveries. Generally, the Custom Recovery can do the same with the default but also gets the additional features. With it, it is possible to flash the third-party ROM, root your Android in Recovery mode, make backups and perform other tasks.
Part 3: How to Root Android in Recovery Mode
Before you start to root your Android smartphone in recovery mode, you need to pay attention to the following items for preparation:1. Flash the Custom Recovery to Android phone. As it is said in part 1, the default Recovery from Google is pretty basic. So if you want to root your Android in recovery mode, you should firstly flash the Custom Recovery environment to replace the Android's Stock Recovery.
2. Full charge your device. Low battery power can be one of the most probably reasons that you would fail to root your phone successfully.
3. Back up Android files. To prevent data loss after the rooting process, please don’t forget to make a backup of your important data on mobile.
4. Download the root package. Please search for the suitable root package(a zip file) from Internet according to your device's model number.
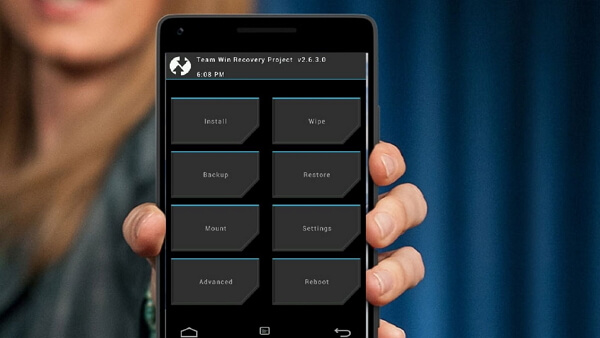
Now, you can continue to follow the steps below to begin to root Android in recovery mode.
Step 1 Please enable the USB debugging on your Android device and then connect it to computer via the USB debugging(click here to see how to enable USB debugging).
Step 2 Copy the root package file and paste it to the main directory of your SD card from your phone.
Step 3 Unplug your device and turn it off. Pull out the battery and then place it back. Now you can hold certain buttons to enter Recovery Mode of your Android. Each phone may get different way to enter this mode. You can have a quick check on the Internet according to your phone.
Step 4 Now, you are able to use "Volume Up" and "Volume Down" button to select the option in the recovery mode interface. Please choose "Install" option and press home button to confirm it.
Step 5 Choose the root package(a zip file) from SD card and it would start to root your phone.

Step 6 During the rooting process, your phone may restart automatically. All you need to do is to wait for the process to the end. After that, just select "reboot system now" and the press on the home button. Restart your device so you can complete the rooting finally.
Part 4: Solve Bricked Phone If It Fails to Root(Only for Samsung Phone)
If your Android cellphone has suddenly stuck into bricked phone when some code program has been cleared after you have rooted the device, it is practical to fix this case via Android Data Extraction which does not only let you recover lost files but also solve the problems of bricked devices.

Step 1 Run Android Data Extraction
Install this program on the computer and then double click to run it. The homepage will come out and there is an option named "Broken Android Data Extraction" allowing you to press.
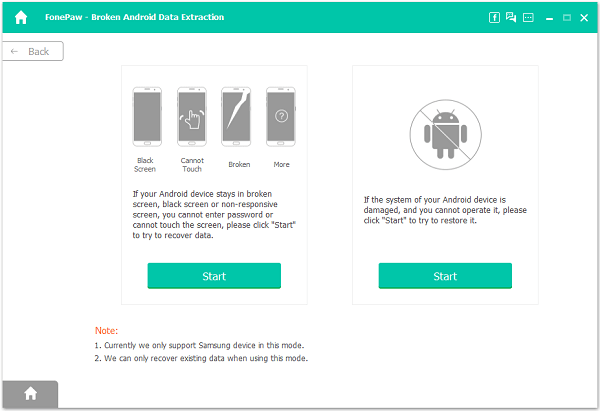
Step 2 Select Fault Type
The following screen requires you to choose a fault type of the stuck interface.
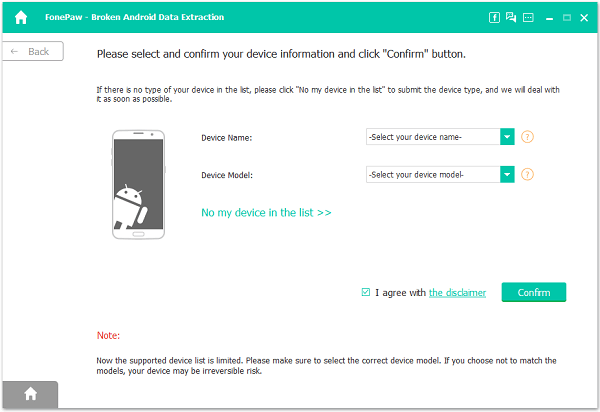
Step 3 Get the Device into Download Mode
Please do as the instruction displayed and you will get into the Download mode easily.
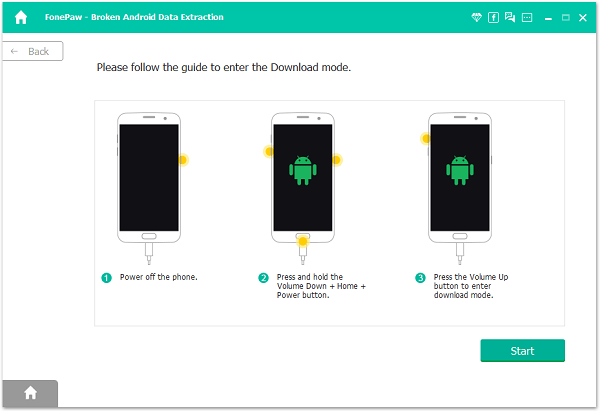
Note: The other two stuck cases can be chosen, also. Once you press them, you just need to connect to PC quickly and let the software make it back to normal status.
Step 4 Connect Device to PC
When you have connected the device to the computer, the program will recognize the models of the device and version of the Android. You are allowed to plug the cellphone or device into the computer at this step or at the step 1, which is up to you.
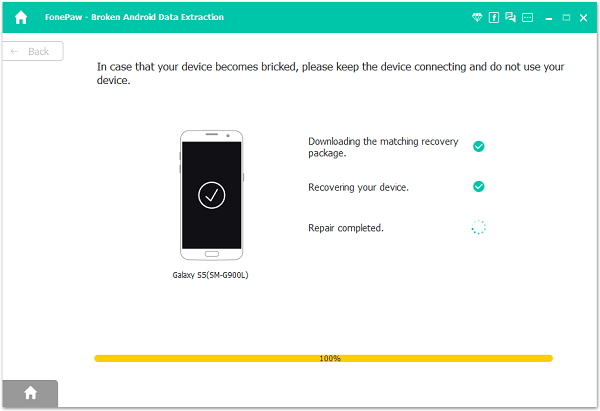
Step 5 Recover Device until It Restarts
The smart program will get your cellphone/tablet into analyzing and it will download a package to recover your bricked phone. After it is done, the device will restart and the screen would give you tips.
It seems complex for some Android users. Don't worry, if you have any questions, you can email us or leave them in the comments. We are please to provide our help.
Click here to Read more: How to Restore SD card in Recovery Mode


