Android Data Recovery
Ultimate Guide to Set Up iMessage on Mac
-- Wednesday, August 23, 2017
Don't Miss:
Guide to Set Up iMessage on Mac
1. Set up iMessage on MacStep 1 Launch Messages from your dock and enter your Apple ID email address and password.
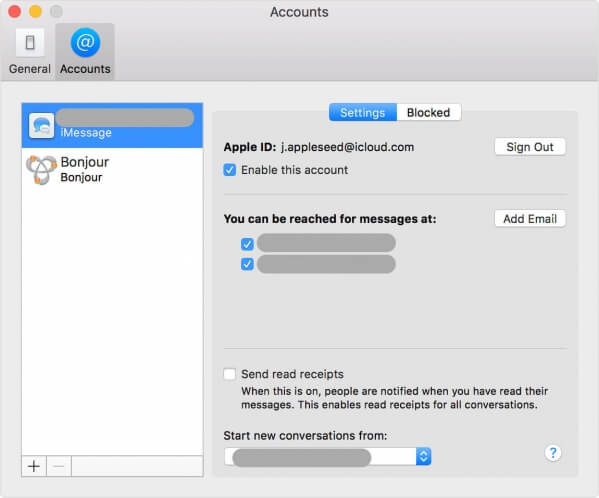
Step 2 Click on Messages in the Menu bar and select "Preferences".
Step 3 Choose "Accounts" on the windows and select phone number and email addresses that can be reached for messages.
Step 4 Choose which phone number or email address from the box on the bottom, which would be displayed when you start a new conversation.

2. Send Messages to Others on Your Mac
You can set up Messages to send and receive SMS and MMS messages on your MacBook or iMac if you own an iPhone with a cellular plan, which supports to send to the recipients with the other OS systems like Android.
Step 1 On your iPhone, go to "Settings > Messages > Send & Receive" and add your phone number and email address.
Step 2 Continue to go to "Settings > Messages > Text Message Forwarding" on your iPhone, then choose to allow your Mac to send and receive text messages from this iPhone.
Step 3 Turn to your Mac for a verification code. Then enter that code on your iPhone and the job is done.

3. Stop using iMessage on Mac
If you don't want to use iMessage app on your Mac anymore, you can disable it or sign it out. In this way, you won't receive any message.
Step 1 On your Mac, go to "Messages > Preferences" and click on "Accounts". Select the "iMessage" account on the left pane.
Step 2 Now, you can choose to make the account inactive(Deselect "Enable this account") or sign out.
Meet with some troubles when you set up iMessage on your Mac? Please tell us the details about it by making a comment below and we may provide with a solution!


