


Android Data Recovery


How to Set Up HTC Vive
-- Saturday, July 30, 2016

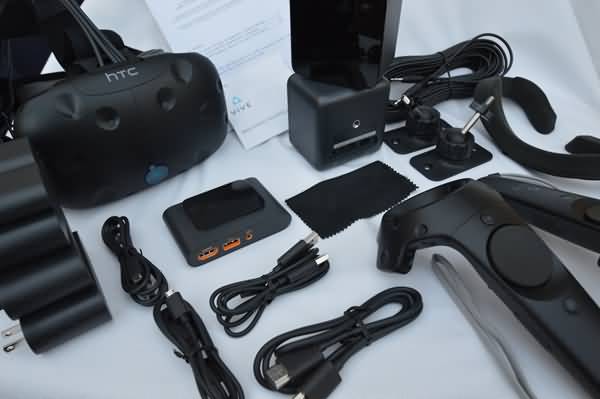
Before we get the party started. let's take a look at all the items that contain in the HTC Vive packing box. Check for what you're owning now. Make sure that you don't miss one of them.
Headset with attached 3-in-1 tether and audio cord ×1
Link Box ×1
USB Cable ×1
HDMI Cable ×1
AC Adapter ×1
Controllers ×2
Micro-USB Cables ×2
AC Adapters ×2
Base Stations ×2
AC Adapters ×2
Sync Cable (optional)×2
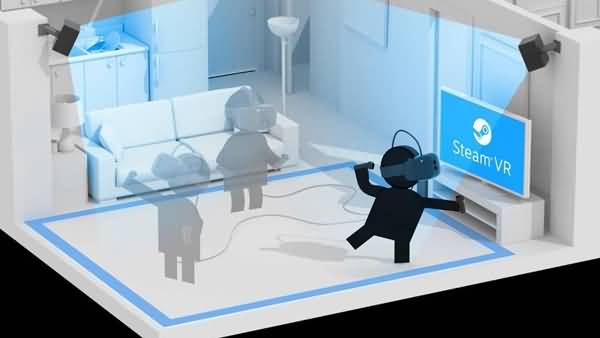
Aside from all these, you need to pick a room with some free space scaled at least 2m×1.5m (or 6.5 ft.× 5 ft.). The maximum distance supported between base stations is 5m (or 16 ft).
Your VR area should be clear of furniture and pets - look for two corners of the room (or high bookshelves) opposite each other that have a good view of this VR area. This is where you will set up your base stations.
Now, let's get it started!
Step 1 PC
For data transmission, HTC Vive needs a USB 3.0 port to connect PC with link box. For video transmission, you can choose HDMI or Mini-DisplayPort. Keep in mind that cables used to connect computer and link box are gray, the same as the case of the link box. After it's done, plug in 12V power line and we're done with this part.
Step 2 Headset
Next, you need to connect line box with HTC Vive headset. There are three cables needed in this part, of which respective are HDMI cable, USB cable and Power line cable. Done connecting three cables, the headset's LED light glows red, which means it's going well.
Step 3 Base Stations
It is probably the most difficult part installing Lighthouse base stations. At first, you need to find a place where is suitable for placing the two stations. (Top of the bookshelves are recommended) Note that the two base station should be able to cover most area at room. Also, hindrances on the way between two stations are not allowed. After plugging in the power, switch on and the light glows green.
Step 4 Software
Good news is that you probably are almost done with this part. Steam VR is on the basis of Steam. You may probably happen to have Steam installed on computer. If you're done right above the previous steps, you will be prompted to install Steam VR by default. After the installation, there is a VR icon at the right top of the interface. Tap on it and the brand new world is open to you!
Step 5 Position
The difference between HTC Vive and Oculus Rift is that the former allows you to step around the room while the latter prefer you to take a seat. The major function of Lighthouse base station is to locate the position of users, so you still need to set up a bit before experiencing VR.
It is easy to do so. You should decide to whether to play when standing up or sitting down. If you want to walk around, you have to perform space calibration. Pick up and aim the controllers at the screen of PC. Next, place them on the floor horizontally to adjust the area of surface. In the end, pick them up and customize the scale of playing space.
That's all! After all these you've been through, you can finally experience virtual reality in person. It is definitely worthwhile! Cant wait? Just go!

Ivy Bruce is the Founder and Editorial Director at Recovery-Android Studio. You can also find her on Google+ and Twitter.
![]()
![]()
![]()
![]()


