Android Data Recovery
How to Get Samsung Rooted with Odin3
-- Wednesday, July 19, 2017
There are some unexpected situations when you try to root Samsung Galaxy with Odin3 may result in a failure or even danger to your Android handsets, such as powering off because of low battery power, disconnection between Android device and PC during rooting as well as some mistaken operations. However, just take it easy. Your phone won't be bricked if you follow the process step by step with prudence.
However, rooting will void the warranty of your Samsung phone. If your Android phone is newly bought or still enjoys a long-period warranty, think twice before your action.
Preparation before Rooting
Launch "Setting" Apps on your Samsung smartphone, and then head to "About device" as to check out the "Device name", "Model number", "Android version" and "Build number ".
Go to Autoroot.Chainfire. In accordance with the information confirmed above, select and download the root packages.


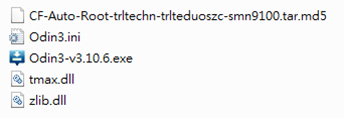
You will then be able to get Odin V3.1.0 and CF-Auto-Root-xxxxx.tar.md5 after extracting the zip file.

Starting to Root Samsung Galaxy with Odin3
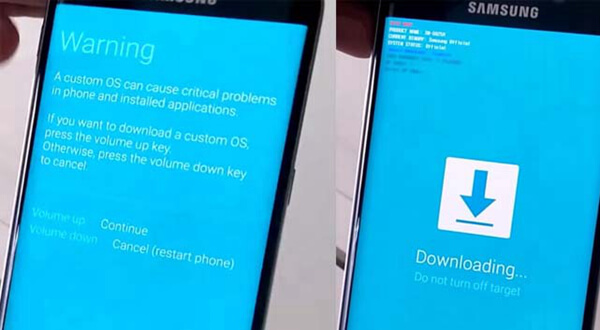
Step 1 Boot into Download ModePower off you Samsung device in the very first place. Then, press and hold Power Key, Home Key and Volume Down Key at the same time for a while. When prompted as showed, press the Volume Up Key to continue the process and you will enter Download Mode.

Step 2 Perform Odin3 and Connect Samsung Device to PC
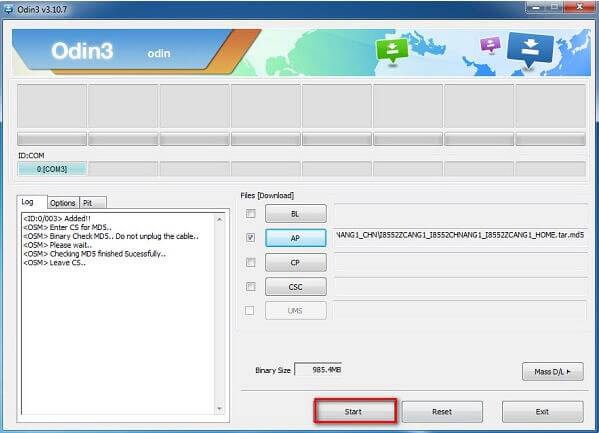
Launch Odin3, and connect your Samsung via USB cable to PC. Once you have connected your handset to the computer, Odin3 will automatically recognize the device and prompt "Added" in the lower-left panel.
Now, click on the "AP/PDA" button and select the file extracted in advance. After that, click on the "Start" button to begin the rooting process.

It will take a few seconds to finish rooting, and when it finished, the green "PASS" will inform you that the rooting process is finished. After that, you Samsung phone will reboot automatically.
Step 3 Check out Root Status
When your Samsung phone is on anew, there will be a SuperSu app showed on the screen which means you've succeeded in rooting. In addition, you can check out the root status by using Root Checker.

Solutions for Failures to root
What if it fails to get rooted on your Samsung phone, check out the solutions below.
1.Restart your PC and install Samsung USB Driver, and try to reconnect.
2.Reboot your Samsung phone.
3.Re-install and perform the latest version of Odin3.
That's all about getting rooted on Samsung phones with Odin3. If you're interested, just give it a shot.


