Android Data Recovery
Solution to Windows Detected A Hard Disk Problem
-- Tuesday, October 03, 2017
1. Improper operations when trying to modify system registry setting, install improper plugins, change system file properties or location and so on.
2. System files get crashed.
3. Mechanical or logical error.
4. Virus issue
…
In this article, you will see how to fix the hard disk error and then recover lost data from it easily. Please continue to read.
People also read:
- Part 1: Fix the "Windows detected a hard dive problem" with System File Checker
- Part 2: Recover Data from Hard Disk
Part 1: Fix the "Windows detected a hard dive problem" with System File Checker
As the reasons why "Windows detected a hard dive problem" error appears are various, you can firstly use the built-in Windows System File Checker tool to check and analyze the hard disk issue.Step 1 Check System File
Please go to the searching bar by clicking the Start button on your computer and enter "cmd". Then right click on it and select the item "Run as administrator". Now, you can see the command prompt pops up. Please enter "sfc /scannow" and press Enter key in the command prompt. This command will help to scan the system files and tell whether there is a problem. After the verification is 100% complete, the damaged files will be replaced by a backup copy and thus fix the issue.
Step 2 Perform A ChkDsk
If the "Windows detected a hard dive problem" error cannot be fixed after you go through to check system files in step 1, you can perform a ChkDsk with System File Checker.
To do this, you should also get the Command Prompt. In the Command Prompt windows, please enter the partition drive(which is with the error). For example, if you want to check the local disk(c) for an issue, then you should enter "chkdsk C:" like the below screenshot shows.

In this way, you can check and repair errors for NTFS and FAT file systems.
After trying the two steps, most of you may fix the issue. But if it doesn't, you are recommended to go to a professional repair store to fix it.
Part 2: Recover Data from Hard Disk
If there is a data loss problem after you fix the "Windows Detected A Hard Disk" problem, or in other case, you fail to fix the error but yearn to recover data from the hard drive, you are recommended to use Data Recovery program, a professional tool that will help users recover lost data back to computer. Now, please check on the guide below to see how it works.Step 1 Download Data Recovery Program
First of all, please download and install Data Recovery program on your computer. After that, please launch it.


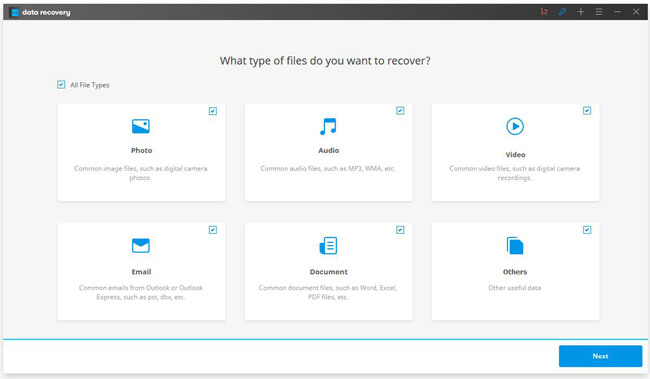
Step 2 Choose File Type to Begin Hard Drive Data Recovery
On the interface, you are able to choose the file types to recover data. In this case, maybe you should select all of them. And then you need to click on the "Next" button to continue.

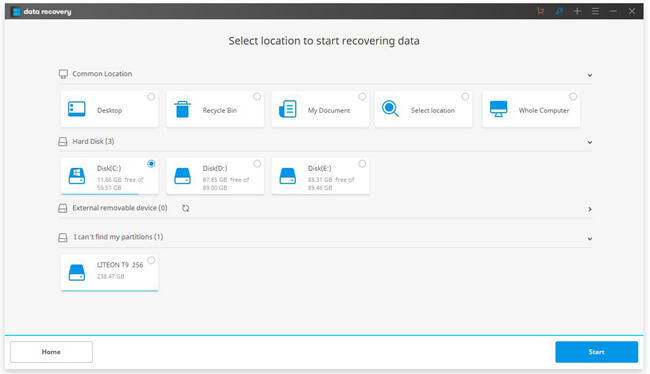
Step 3 Select Location and Scan Hard Drive
If you can find out your hard drive on the program, you need to choose it under the hard disk menu. If you are not able to find your disk, please choose a location under "I can't find my partition" menu.

Click on the "Start" button and your hard disk would be scanned for the data. Please wait patiently. By the way, you are recommended to use the "Deep Scan" mode so that you can get the whole files.
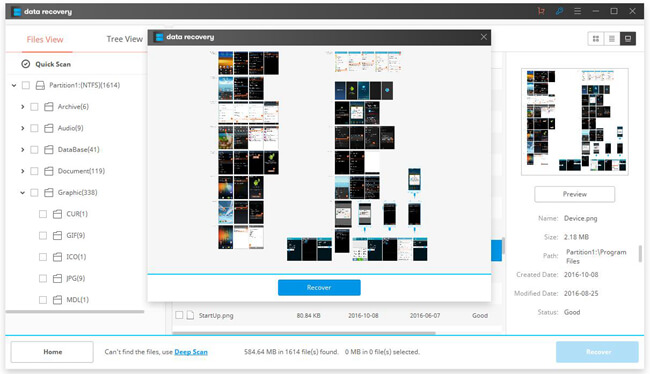
Step 4 Recover Data from Hard Disk
After the scanning process, you are able to preview the file. Then please click on the "Recover" button to get them back on your computer.

If you have any question about this article, please let us know by leaving us a comment below!


