Android Data Recovery
Troubleshooting:Fix Recuva Deep Scan Stuck and No Data Found
-- Sunday, October 01, 2017
-----forum.piriform
Recuva software frozen and stuck in the deep scan process might be error that most users complained. Recuva will offer you deep scan option when you cannot find the target files in the quick scanning result. Deep scan is a far more thorough method, which takes a lot longer to search for deleted, corrupted, even overwritten files on your drive.
Also read:
- Part 1. Why No Deleted Files Found in Recuva Deep Scan Result
- Part 2. How to Perform Deep Scan Lost Files Recovery
Why No Deleted Files Found in Recuva Deep Scan Result
According to Recuva support, files in the deep scan result will be listed like [Graphics: BMP, JPG, JPEG, PNG, GIF, TIFF
Microsoft Office 2007: DOCX, XLSX, PPTX
Microsoft Office (pre-2007): DOC, XLS, PPT, VSD
OpenOffice: ODT, ODP, ODS, ODG, ODF
Audio: MP3, MP2, MP1, AIF, WMA, OGG, WAV, AAC, M4A
Video: MOV, MPG, MP4, 3GP, FLV, WMV, AVI
Archives: RAR, ZIP, CAB
Other file types: PDF, RTF, VXD, URL
Part 2: How to Perform Deep Scan Lost Files Recovery
Since you failed to recover data with Recuva deep scan mode, you can turn to highly recommended Data Recovery. Data Recovery also provides Quick Scan and Deep Scan mode. Its deep scan will also take a bit longer than quick scan, but seldom freeze or stuck. And it supports almost 200 file formats. Moreover, the previous file names will remain as that of the recovered files. Check the following easy steps of Data Recovery.


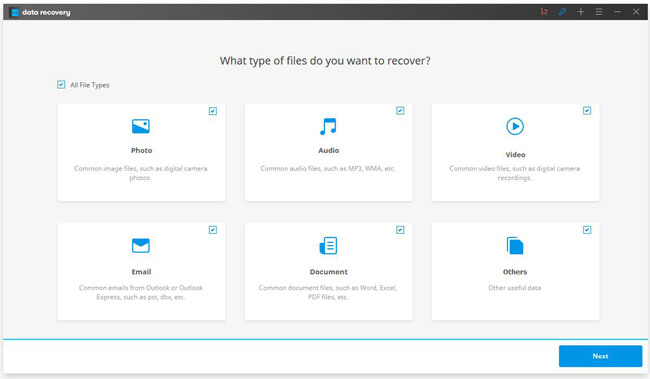
Step 1 Choose Lost Data Types
Run the Data Recovery on your PC or Mac, various types of data that recoverable are shown in the main interface, including photos, videos, audio, email, documents and more. Select the one you want to restore and hit Next to move to next step.

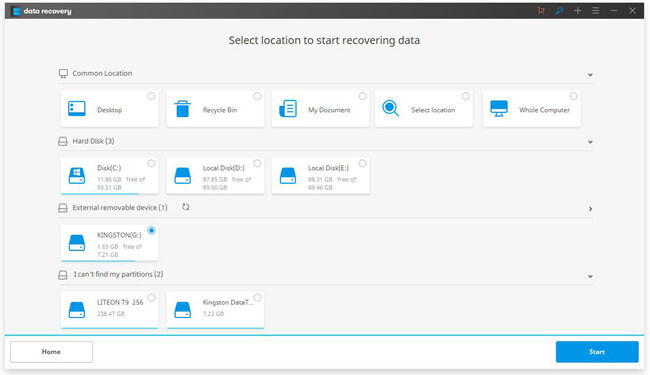
Step 2 Select Where Data Get Lost/Deleted
Select a common location on PC/Mac or connect the external hard drive or SSD via SATA cable to the computer, you can recover deleted files from whatever devices you want. If you don't know well where the lost data stored, you can choose Whole Computer option.

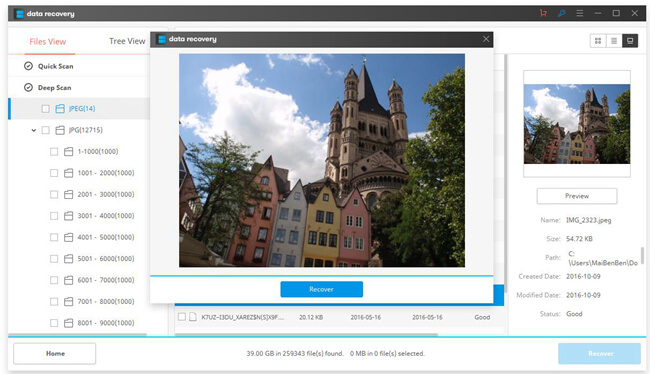
Step 3 Preview and Recover Lost Data
Click into the Deep Scan column, you can preview the files in the scanning result. You can check the file name, size, path, created date, modified date as well as status, which shows if it's intact or not. Hit the Recover button to finish recovery.

From the above, you may know how useful Data Recovery is. If you freak out with Recuva, why just give it a shot to Data Recovery?


