Android Data Recovery
Google Nexus 5/6/6P Data Recovery
-- Thursday, January 28, 2016
It happens from time to time that we delete/lose some files and regret it before long. What to do if this happens? To protect the data from permanently wiped from your Google Nexus, you should make sure that:
1. You have backed up all data on Android Google Nexus phone before you deleted data.
2. Don’t add or delete any data on your Android phone after you accidentally delete/lost your Google files. Just leave it alone and find some data recovery software like Android Data Recovery.
Android Data Recovery is a brilliant data recovering program for different Android phone brands. Of course, Google Nexus is included. Nexus phones and tablets that runs from Android 2.3 to Android 6.0 works perfectly on this software including the latest Nexus 5, Nexus 5X, Nexus 6 and even Nexus 6P!


Simple Steps to Recover Deleted Files from Google Nexus Phone
Step 1 Launch Android Data Recovery on PCDownload and install Android Data Recovery on your computer. Then, connect your Google Nexus 5, Nexus 5X, Nexus 6 or Nexus 6P to the computer via USB cable.
Step 2 Enable USB Debugging on Google Nexus Phone
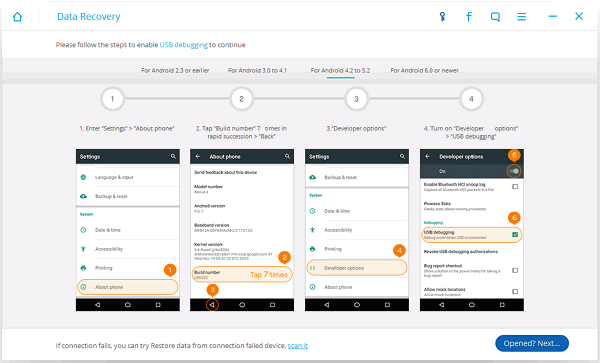
Before you start recovering your Google Nexus, you have to enable USB debugging first if you had never enabled it:
1. For Android 4.2 or the newer: Enter "Settings" > "About Phone" > "Build number" and tap on "Build number" for several times till you get the note: "You are under developer mode", you can go back to "Settings" > "Developer options" > ”USB debugging".
2. Android 3.0 to 4.1: Enter "Settings" > "Developer option" > "USB debugging".
3. Android 2.3 or earlier: Enter "Settings" > "Applications" > "Development" > "USB debugging".

Step 3 Select Files to Scan
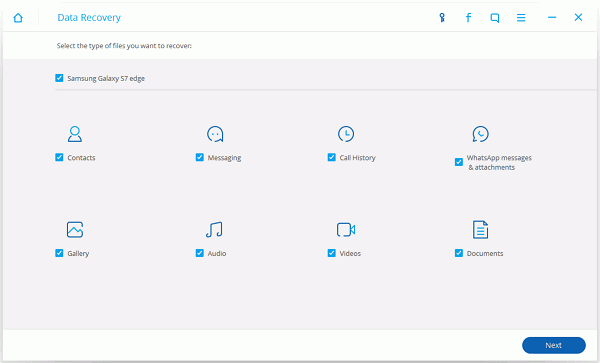
After enabling USB debugging on your Android, your Android phone will be detected. And now, you are allowed to select the types of files you want to recover. You can tick all of them if you want to restore all Google files. Of course, only choose the data type you want will save you time. Choose those you want and click "Next" to move on.

Step 4 Scan Android for Deleted Files
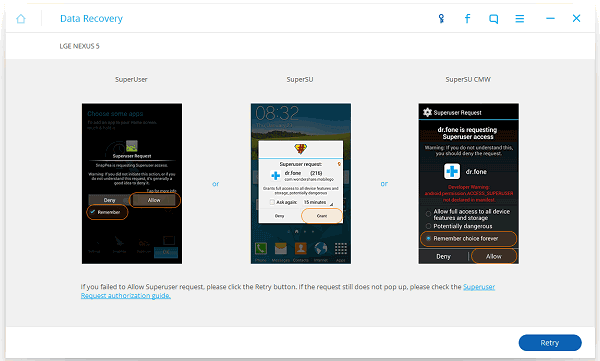
Now, you will see the windows below, turn to your Android and follow the instruction. Tap on the "Allow" icon, and hit the "Start" button on the computer. After that, the program will start analyzing your Android data.

Step 5 Preview and Recover Google Nexus Contacts/Messages/Photos/Videos
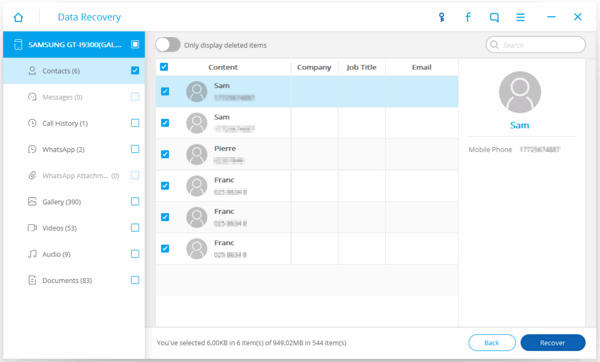
As you can see in the interface below, you will see the recoverable data types listed in the left side of the interface. The deleted data will be shown in red and the existing one in black. You can selectively choose lost files to recover. After that, hit the blue "Recover" button in the lower-right of the corner.

Note: Now, you’ve recovered all the deleted Google files you want. You’d better back up the Android data so that you can restore deleted Android data back when bad things happen.
With Android Data Recovery, you can recover almost all Google Nexus data back, including contacts, text messages, call history, WhatsApp, WhatsApp attachments, Gallery, Videos, Audio and documents. If you have any issue on recovering Google Nexus data, please feel free to let us know.


