Android Data Recovery
How to Recover Phone Numbers on Android
-- Wednesday, December 18, 2019
In this article, it would introduce two methods to recover contacts from your Android phone, such as Samsung Galaxy S8, Google Pixel and OnePlus 3T. But before you try to find out the way to get back your data, you should firstly figure out if the contacts have really lost from your phone. Now please check it out.
- Part 1: Check If the Contacts Have Really Lost
- Part 2: Recover Contacts from Gmail Backup
- Part 3: Recover Phone Numbers from Samsung Account
- Part 4: Restore Lost Phone Numbers from Android Phone
Part 1: Check If the Contacts Have Really Lost
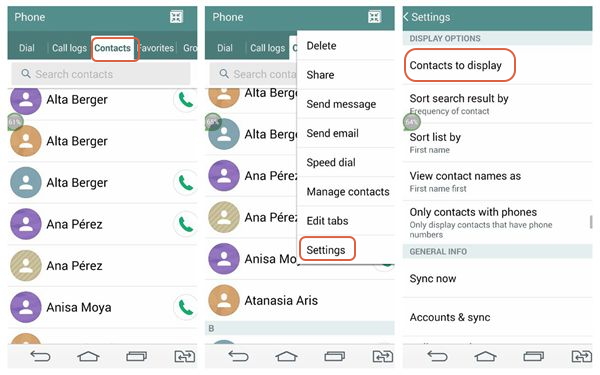
When you can't see any contacts on your Android phone, you may think you have lost them completely. If you own an device with Android 4x such as Android 4.4, however, please do check if the contacts have really gone or not before you take any action to recover the data back on your Android. Just follow the below steps to confirm:1. Go to "Contacts" on your phone.
2. Tap on the menu button on the top-right corner of the screen and choose "Contacts to display" option.
3. Select "All contacts" and check if it would display the contacts you are looking for.
If you make sure that the contacts have been lost without any doubt, please continue to read to get back the lost data.
Part 2: Recover Contacts from Gmail Backup
As you are able to back up your data such as contacts from Android to your Google Account, you can of cause restore the data from it. But you need to make sure that "Back up and sync" is on so that it would backup data automatically to Google Account. Now, please check the guide below to restore contacts from Google Account:1. In order to recover the Gmail contacts, please sign into your Gmail and then go to your inbox.
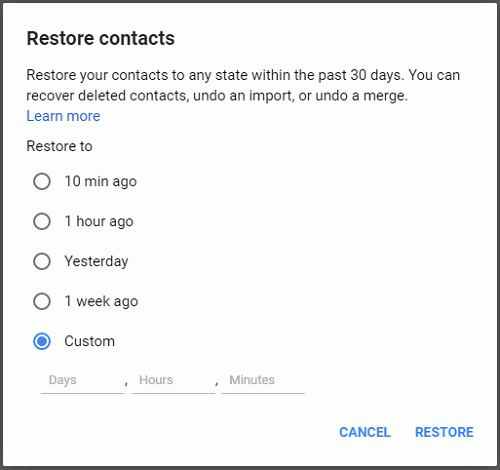
2. Choose "Contacts" from the dropdown menu on the left pane. Click on "More > Restore contacts…" whether you can see the list of your contacts or not.
3. On the pop-up window, you are able to restore the contracts within 30 days. Choose the date and then click "Restore".
Part 3: Recover Phone Numbers from Samsung Account
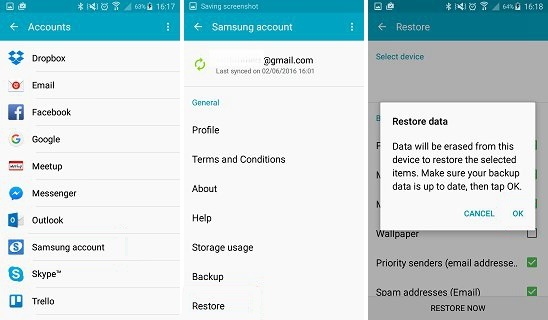
If you have backed up phone numbers with your Samsung account, you can of course restore those lost contents by using the account. It is pretty simple to deal with it. Now, let's check it out below.Step 1 Please go to "Apps > Settings" on your Samsung screen.
Step 2 Scroll down and find out "Backup and reset" option.
Step 3 Tap on "Restore" under the Samsung account menu.
Step 4 Now you can see the contents such as messages, phone logs and more that you have backed up before via the account. Choose the data you want to get back and tap on the "RESTORE NOW" on the bottom.
Part 4: Restore Lost Phone Numbers from Android Phone
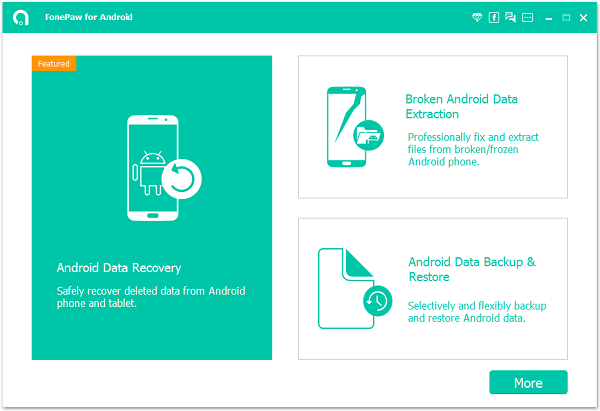
Here is a wonderful and effective way to recover your unfortunately deleted or lost Contacts phone numbers. It requires an Android phone contacts recovery tool: Android Photo Recovery, which allows you to undelete and recover your phone numbers directly, as well as messages, photos and videos from Android. Please get this program with below buttons to get back the deleted contacts to your Android phone contacts list. (When you click the download button on mobile phone, you will get 20% off discount.)


Note: Once you find your Android data get lost unintentionally, please try not to use your device if possible. It is because when you add or delete any phone number after losing data, the data you want to restore can be automatically overwritten. That is, your phone number that deleted unintentionally is likely to leave you forever.
Step 1 Connect your Android phone to the computer
Once you install and run the program, it will ask you to connect your Android phone to the computer. Please plug your Android into computer via the USB cable that is matched.
Step 2 Enable USB Debugging on Your Android
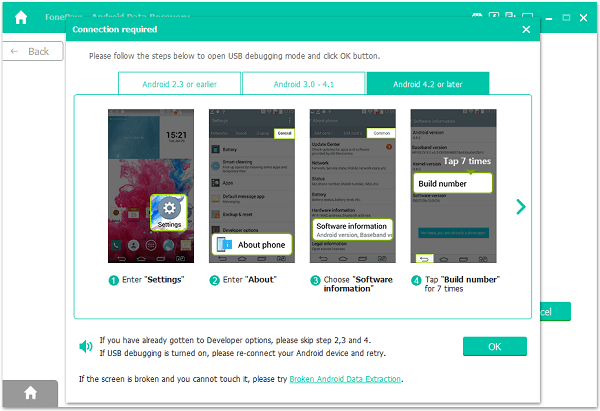
If your phone has not open USB debugging, this program will prompt you to move to your Android phone to enable USB debugging.
1) For Android 4.2 or newer: Enter "Settings" > Click "About Phone" > Tap "Build number" for several times until getting a note "You are under developer mode" > Back to "Settings" > Click "Developer options" > Check "USB debugging"
2) For Android 3.0 to 4.1: Enter "Settings" > Click "Developer options" > Check "USB debugging"
3) For Android 2.3 or earlier: Enter "Settings" > Click "Applications" > Click "Development" > Check "USB debugging"
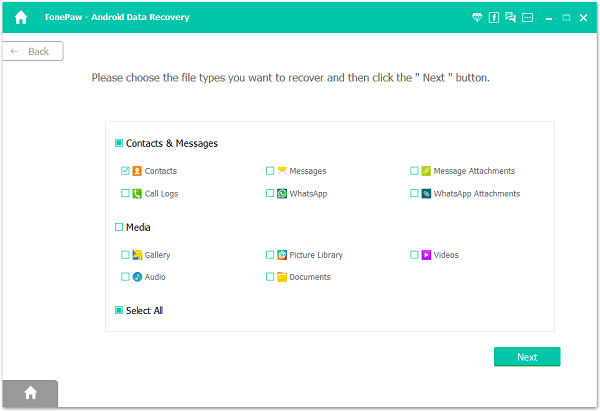
After your device identified, you can get your Android ready to be scanned. Tick the ones you want so as to save more money. For example, "Contacts", and click next to start the scan.
Step 3 Allow Software to Scan Lost Data
Note: Before starting, please make sure that battery of your device is more than 20% charged.
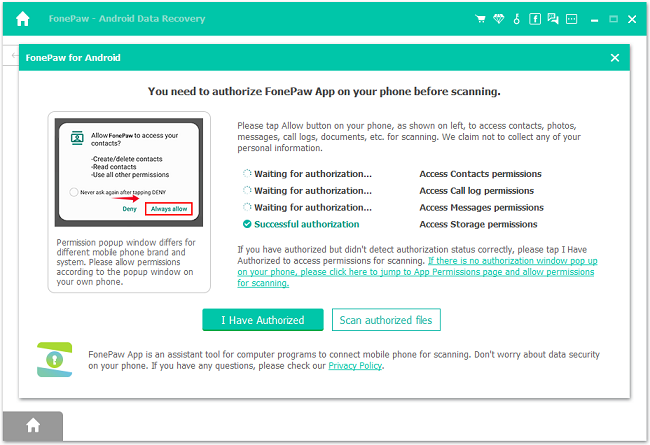
When you get a window as follows, turn back to your phone again and click "Allow" to permit FonePaw app installed and let it access phone data (contacts, call logs, messages and more) to begin the scan.
Step 4 Preview and Retrieve Phone numbers
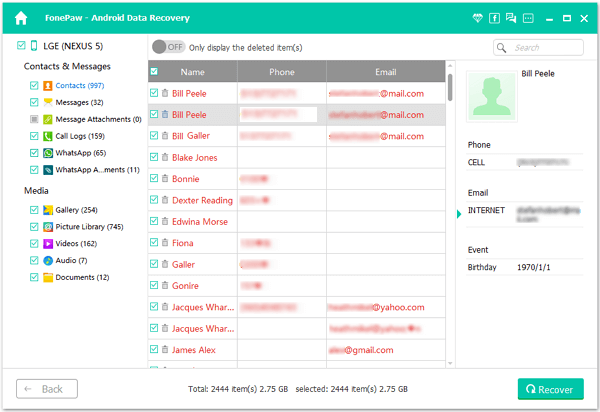
The program will detect your phone and analyze it. As you cannot get the numbers that you need, you can move into Deep Scan mode to find more deleted items. When the scanning finish, you will find all your deleted (orange ones) or remained (black ones) contacts are listed on the right window. Choose those you want and click "Recover" to save them to your PC.
Tip: If there is no Deep Scan option for you, it means that the program has scanned your phone in deep mode and the results are displayed after deep scanning.
Step 5 Check the Result on PC
After recover your phone numbers on your computer, you can check the contacts you just restore on the folder which is pop-up automatically. On the folder, the contacts are exported in the format of SCV, HTML and Vcard.
Note: After recover your phone numbers to your computer, you can import them back to your Android phone.
Now, all your lost phone numbers have been saved on your computer with the help of this Android Photo Recovery. Though it could be possible to recover the deleted data, back up your Android data frequently will be encouraged to prevent your Android data from losing forever. In this way, please just back up Android data from time to time.


